For my last project this semester, I decided not to do a wire contour sculpture and come up with my own idea. I wanted to make a small stained glass mosaic, since I've done some other glass mosaic projects in the past and had some materials left over that I could use-some small sheets of glass that were dark blue, blue-gray, yellow, white, and opalescent. I was inspired to do a shooting star by the theme from my marble drop project that I had just completed.I first had to transfer the sketch of my design onto the wood tile and mark what color glass was going to go where. Then I began to cut smaller pieces from the glass sheets to fill up the spaces.Once I filled up a section, I glued the pieces down to the wood. Once all the spaces are filled and the glass pieces glued down, I will grout the spaces between the glass pieces to seal the wood and permanently set the pieces.
One thing I think I did successfully was that I found a good design that would work with the glass that I had. I would have liked to have finished it before the end of the semester, but unfortunately I was sick for almost a week with an upper respiratory infection and couldn't work on it.
Kristin's Art
Thursday, January 16, 2014
Sunday, January 5, 2014
Marble Drop
I worked alone on this project, as I was behind on other projects.
The theme for my marble drop is a mix of stars, space, and sun and moon. If I had to come up with a title for it, I'd call it "somewhere up above the stars". I don't really know how, when, or why this particular idea came to me; it sort of just popped into my head.
To come up with ideas for the marbled drop, I thought of things in the night sky (the moon, clouds, constellations, shooting stars/comets) and things related to space (planets, rocket ships, suns/stars). I had a much grander vision for this project than I was able to make, but some of the ideas from that original idea were used in the final design. For example, the rocket was originally going to be where the marble landed and the sun was going to be a wheel for the marble to land in.
The most difficult thing about this project was the depth perception required for planning out the design. I had to redo my design sketch at least twice because my box was too small.
The marble travels through cardboard tracks, in different shapes- three are flat square tracks, one is half a cardboard tube, and two are more triangular. I made my own tracks out of cardboard. I cut thin pieces of cardboard into 1-in. strips, taped them together either in a pair or in a group of three, painted both sides black, measured the size the track would have to be to fit in the marble drop, hot glued the outer edges together, taped over the glued edge, then finally painted over the tape. After they were glued into place, I brushed some watered-down glue onto the front side of the track and dusted on some black glitter.
If I could change anything, I would change the box- make it slightly bigger and make the walls of the box straighter.
I'm proud of the whole piece, and I love the way it turned out.

<-----The top half of the marble drop

The bottom half of the marble drop ----->
My workspaces

 |
| My marble drop |
To come up with ideas for the marbled drop, I thought of things in the night sky (the moon, clouds, constellations, shooting stars/comets) and things related to space (planets, rocket ships, suns/stars). I had a much grander vision for this project than I was able to make, but some of the ideas from that original idea were used in the final design. For example, the rocket was originally going to be where the marble landed and the sun was going to be a wheel for the marble to land in.
The most difficult thing about this project was the depth perception required for planning out the design. I had to redo my design sketch at least twice because my box was too small.
The marble travels through cardboard tracks, in different shapes- three are flat square tracks, one is half a cardboard tube, and two are more triangular. I made my own tracks out of cardboard. I cut thin pieces of cardboard into 1-in. strips, taped them together either in a pair or in a group of three, painted both sides black, measured the size the track would have to be to fit in the marble drop, hot glued the outer edges together, taped over the glued edge, then finally painted over the tape. After they were glued into place, I brushed some watered-down glue onto the front side of the track and dusted on some black glitter.
If I could change anything, I would change the box- make it slightly bigger and make the walls of the box straighter.
I'm proud of the whole piece, and I love the way it turned out.

<-----The top half of the marble drop

The bottom half of the marble drop ----->
My workspaces

Repetition
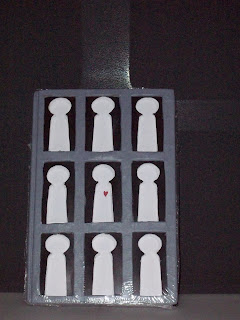
For this project, I went with a theme of societal norms and following your heart.
First, I cut cover so that it would divide the book into nine sectors for the figures. I went on Google and looked for a model to use as the figure by looking up paper dolls. When I found one that I thought would work best, I traced the model onto the cover page and began to cut into the book. I had a great deal of trouble cutting into this book, as the pages kept ripping. Eventually it became too frustrating, so I gave up trying to cut through to the back cover and began painting.
For the paint, I went for a minimalistic approach to show contrast between the layers, and also so that the different middle figure would stand out more. I was originally was going to drip watercolor paint onto the middle figure, but ran into two problems: I couldn't come up with a good plan of action for it, and I was running out of time for my marble drop. So, I went with a much simpler idea: to paint a small red heart in the middle figure.
One thing I did successfully was how I painted the book because it had exactly the effect I wanted. One thing I would change about this project is the book that I used because it was a little too small, and the paper was surprisingly stubborn and hard to cut.
Thursday, January 2, 2014
Texture/ Pressure
For my Texture project, I chose to take the word "pressure" rather literally and make a sculpture of metamorphic rock.
At first, I had some difficulty in carving the curved lines on the clay. However, I got lucky: the person in front of me had cut a slab of clay and left a textured pattern on top that was perfect for my piece. The only problem with this was that I couldn't throw it to get rid of trapped air bubbles, so I eventually had to carve the bottom of the slab out. For the crystals, I molded some small bits of clay, stuck them onto the slab, and covered the bottoms of them with slip to make it seem like they were coming out of the slab. After I finished painting, I coated the crystals with a gloss to make them shinier.
Wednesday, December 25, 2013
Land Art
Pinterest page: http://www.pinterest.com/kristinpflug/land-art/
Land art is a form of art made from natural materials or nature itself. It can be any size, from small rocks and leaves to entire fields and shorelines. It is always temporary, wiped away by nature.
Land art is a form of art made from natural materials or nature itself. It can be any size, from small rocks and leaves to entire fields and shorelines. It is always temporary, wiped away by nature.
Wednesday, December 11, 2013
Relief Art
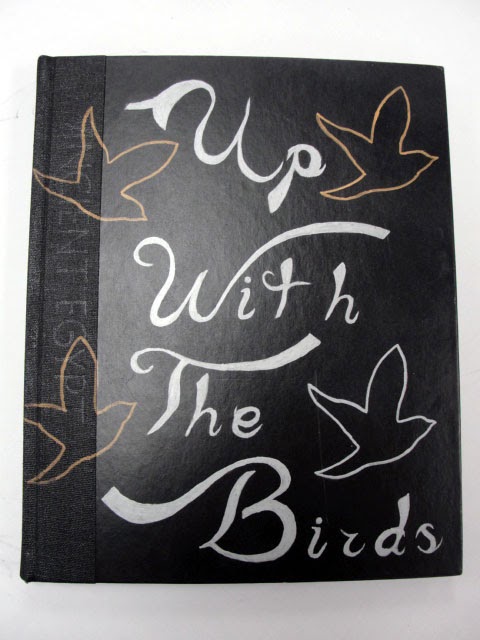
For my Relief project, I chose to do an altered book because I wanted to try something different and it seemed like an interesting idea. My piece is a sunken type of relief, since I cut into the book to create a 3D scene. First, I had to choose a book that was the size and thickness I wanted. I drew the design I wanted to make and planned it out as a 3-dimensional picture: which parts were going to be which layer and how thick each of those layers were going to be. I numbered each layer from foreground to background, starting at 1 (the bird) and ending at 5 (the sky). This was also the order in which I would cut them. Then came the long process of cutting the pages. Basically, I would take five pages at the top of the layer, place a cutting board under them, cut the design out until I had cut through the five pages, then repeat until each layer was finished. This part took me at least two weeks to finish. After I had finished cutting the book, I painted the layers in bright colors and painted the rest of the book black. For the front cover and third page, I created stencils that I cut out and traced onto the book, then filled in with silver Sharpie. I also used the silver Sharpie for the lyrics on the first and second pages. For the back cover, I copied the logo for the Coldplay song "Up With The Birds", which was my inspiration for this piece. I used gold Sharpie for the bird and a blue-green acrylic paint that I bought for the circle surrounding it.
I am most proud of two things: that this piece turned out as amazingly as it did, and that I actually finished this at all (at least before the semester ended). The book turned out exactly as I pictured and hoped it would, and there is nothing at all I would change about it.
 |
| Front Cover |
 |
| MX stands for the title of the album that this song comes from, "Mylo Xyloto." "Up With The Birds" is track number 14. Hence, MX14. |
 |
| Inner Pages |
 |
| Cut portion of book |
 |
| Detail |
 |
| Back Cover |
Tuesday, November 5, 2013
Pinch-Pot Fish
To make my little narwhal, I took a piece of clay about the size of my fist and cut it into three sections. With two of the sections I created two pinch pots out of clay and attached them together. After pushing the ends of each pot together, I filled in the rest of the seam with slip. I took bits and pieces of the third section to make the tail and the horn. For the tail, I attached a rolled-up piece of clay to the back of the sphere, then attached cut-outs of the tail fins. I once again used slip to cover up the seams. I used the remainder of the third section of clay to make the horn. Finally, I poked out the blowhole of the narwhal that would let the air out of the sphere.
Subscribe to:
Posts (Atom)


