Pinterest page: http://www.pinterest.com/kristinpflug/land-art/
Land art is a form of art made from natural materials or nature itself. It can be any size, from small rocks and leaves to entire fields and shorelines. It is always temporary, wiped away by nature.
Wednesday, December 25, 2013
Wednesday, December 11, 2013
Relief Art
For my Relief project, I chose to do an altered book because I wanted to try something different and it seemed like an interesting idea. My piece is a sunken type of relief, since I cut into the book to create a 3D scene. First, I had to choose a book that was the size and thickness I wanted. I drew the design I wanted to make and planned it out as a 3-dimensional picture: which parts were going to be which layer and how thick each of those layers were going to be. I numbered each layer from foreground to background, starting at 1 (the bird) and ending at 5 (the sky). This was also the order in which I would cut them. Then came the long process of cutting the pages. Basically, I would take five pages at the top of the layer, place a cutting board under them, cut the design out until I had cut through the five pages, then repeat until each layer was finished. This part took me at least two weeks to finish. After I had finished cutting the book, I painted the layers in bright colors and painted the rest of the book black. For the front cover and third page, I created stencils that I cut out and traced onto the book, then filled in with silver Sharpie. I also used the silver Sharpie for the lyrics on the first and second pages. For the back cover, I copied the logo for the Coldplay song "Up With The Birds", which was my inspiration for this piece. I used gold Sharpie for the bird and a blue-green acrylic paint that I bought for the circle surrounding it.
I am most proud of two things: that this piece turned out as amazingly as it did, and that I actually finished this at all (at least before the semester ended). The book turned out exactly as I pictured and hoped it would, and there is nothing at all I would change about it.
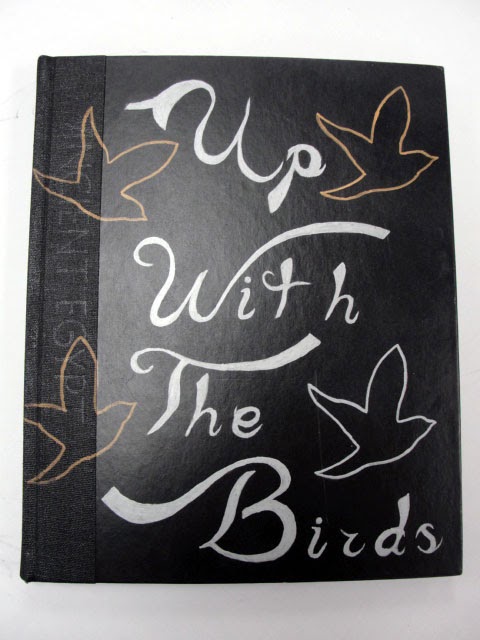 |
| Front Cover |
 |
| MX stands for the title of the album that this song comes from, "Mylo Xyloto." "Up With The Birds" is track number 14. Hence, MX14. |
 |
| Inner Pages |
 |
| Cut portion of book |
 |
| Detail |
 |
| Back Cover |
Tuesday, November 5, 2013
Pinch-Pot Fish

To make my little narwhal, I took a piece of clay about the size of my fist and cut it into three sections. With two of the sections I created two pinch pots out of clay and attached them together. After pushing the ends of each pot together, I filled in the rest of the seam with slip. I took bits and pieces of the third section to make the tail and the horn. For the tail, I attached a rolled-up piece of clay to the back of the sphere, then attached cut-outs of the tail fins. I once again used slip to cover up the seams. I used the remainder of the third section of clay to make the horn. Finally, I poked out the blowhole of the narwhal that would let the air out of the sphere.
Wednesday, October 23, 2013
Vessel Projects

For this vessel project, the medium I used was clay. I chose clay because I took a lot of art classes that worked with clay when I was a kid, so I knew a little bit about how to work with it. This vessel is supposed to be a candleholder, big enough to hold a small- to medium-sized candle.
My process for this was pretty simple.First, I rolled out the clay to make a flat sheet, then measured out the dimensions I wanted for the candleholder. After that, I cut out the clay according to those measurements. For the design, I used a marker top and a small jar that I pressed into the clay to leave the imprints. I made sure to press hard enough to leave a deep enough indent without pressing through the clay. On one side, I cut out the smaller circles and the large inner circle, leaving the indent around the large circle. The scratches at the bottom of the sides were a mistake; I had planned to wrap a clay strip around the bottom, but ended up running out of time. Also, the strip I was going to use ended up being too dry. I chose a gray glaze for the outside to make the design pop out, and I used the blue for the inside to contrast the gray and yellow outside.

For this vessel project, I decided to make a pencil holder made of pencils. I chose to use pencils because I thought it was funny and creative. This vessel will hold pencils, pens, other assorted office supplies, or anything else I feel like putting into it.
This project took a lot longer for me to do. First I had to decide what pattern to use: whether I'd use sharpened or unsharpened pencils, how I would arrange them, etc. I decided to use unsharpened wooden pencils because I knew I had a great many of them in my desk that I knew I would never use. So, I gathered my many unused wooden pencils. I also decided to use cheap novelty erasers for the bottom and bought a piece of craft wood for the base. Putting together the pencils, I found out superglue was not an effective bonding agent for gluing pencils together. Luckily, I remembered I had gotten safety-orange duct tape for my birthday, so I just used that. I would take the number of pencils that I needed for one side, lined them up in the order I wanted them in, put a square of cardboard over them to make it rigid, and put strips of duct tape down. Once all the sides were taped, I taped the corners together to make the box. I took the project in to hot glue the edges and do the finishing touches. I also tried to glue the erasers onto the base, but found out hot glue was not an effective bonding agent for gluing cheap erasers onto craft wood. I later glued them on using tacky glue.
Tuesday, September 24, 2013
Art Article #2
Art Article 2
Starry Night is a painting by the Dutch
post-impressionist artist Vincent van Gogh, and is one of his most well-known
works. Painted in June 1889, Starry Night was inspired by the view outside of
his sanitarium room window at Saint-Rémy-de-Provence (located in southern
France). Unlike van Gogh’s earlier painting Starry Night Over the Rhone,
which holds many similarities to Starry Night, the new night scene was painted
in daylight, all from memory. The center part of the painting shows a quiet
village by the mountains under a swirling star-filled sky. The village was
partially invented and the church spire has been said to be a tribute to his
home country, the Netherlands. The
cypress tree to the left was later added into the composition. Art historian
Joachim Pissarro cites Starry Night
as an example of van Gogh's fascination with the night. This painting has been
in the permanent collection of the Manhattan Museum of Modern Art in New York
City since 1941. Starry Night has
been the subject of poetry, fiction, and the well known song "Starry,
Starry Night" by Don McLean. Some people have speculated about the eleven
stars in the painting and its possible connection to the story of Joseph in the
Old Testament (Genesis 37:9). One of van Gogh’s other paintings, Sunset at
Montmajour, has just recently been discovered after sitting in a Norwegian
attic since the early 1900s; it is the first full-size work by van Gogh to be
discovered since 1928.
Subscribe to:
Posts (Atom)